Laser marking and industrial treatments: mastering mark durability after processing!
The challenge isn’t marking the part, it’s staying legible after treatment
E-coating, painting, shot blasting, sandblasting, heat treatment, machining, phosphating: every downstream treatment attacks the mark in its own way. A coating covers it, shot blasting hammers it, machining removes it, heat treatment destroys its contrast.
Yet traceability requires the code to remain usable after these steps, sometimes all the way to the end customer.
Laser marking meets this requirement. Contact-free and with no consumables, it adapts to a wide range of materials and production rates. Above all, depending on the parameters used, it can produce marks with very different physical characteristics, which makes it compatible with most industrial treatments.

Not all laser marks are created equal: The same laser produces marks with very different physical properties depending on the parameters used: depth, relief, type of interaction with the material. Faced with a given downstream treatment, some marks hold up and others disappear.
The result doesn’t depend on the laser alone: The same laser delivers very different results depending on the marking method used. It is the combination of equipment and method that determines whether the mark will survive the treatment the part is about to undergo.
Disappear or survive: two opposite needs, sometimes on the same part:
Internal traceability: the laser marking serves its purpose during manufacturing, then has to disappear under the final treatment.
Example here: letters identifying a powertrain variant on a vehicle door, used as a poka-yoke marker during assembly, then covered by the paint.
Full traceability: the laser marking must remain legible after treatment. Serial number, Data Matrix code required by a standard or intended for the end customer.
A single laser covers both cases on the same part. On vehicle doors, the EL/TH letters disappeared after e-coating and black paint, while the serial number remained legible. The same laser is used; only the marking parameters change.
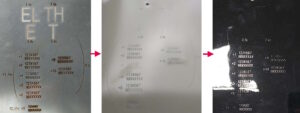
The results below are concrete examples of production applications. Real parts, marked and then run through our customers’ manufacturing processes. Each treatment poses a different problem for the mark. Each one has its answer.
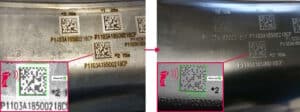
On steel as well as aluminum, a Data Matrix code marked before e-coating remains legible after the coating is applied.
Here, a vehicle chassis part (Body in White): a Data Matrix code and its text marked before going through the KTL bath.
After treatment, the code remains perfectly legible. Marking time here is 12s.
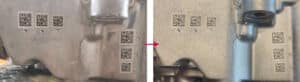
Shot blasting deforms the code cells at the surface. To keep the Data Matrix code legible after impact, the marking parameters are adjusted to the size of the blast media used.
In this case, nine marks placed at different positions on an aluminum transmission housing were used to validate the repeatability of the process. Marking time for a Data Matrix code ranges from 6 to 10 seconds depending on code size, for a depth of approximately 0.2 mm.
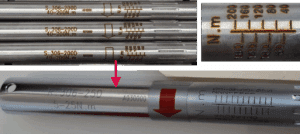
When the treatment removes material, the mark must be deeper than the thickness removed.
This example shows a mark on torque wrench components. A grinding operation is performed on the tube, affecting the marked surface. The marking depth achieved is 0.2 mm, for a cycle time of 38 seconds, including tube rotation.
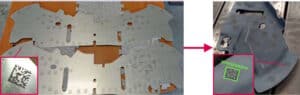
Heat treatment can severely reduce any visual contrast in the mark. This operation is generally performed on steels and cast irons.
Here, an automotive sheet metal part undergoes this treatment and reaches 950 °C after marking. With suitable parameters, the contrast is preserved and a standard code reading system decodes the Data Matrix code without difficulty. Marking time is 2 seconds for a 12×12 mm code.
Every combination of material, geometry and downstream treatment produces a specific result. No lookup table can predict it. Validation is done on your parts, in your process.
The approach: defining the requirement (content, code size, cycle time, downstream treatment), marking representative samples, running them through your actual production flow, checking legibility after treatment. The reading setup (lens, lighting, angle) is part of the optimization.
At the end, a feasibility report with documented results and validated samples, before any commitment to equipment.